Welcome back to the Toy Chest!
I know it’s been years since the last post but I was recently inspired to try something and thought what better way to open up the Toy Chest again than by documenting this process. So without further ado, let’s jump into it.
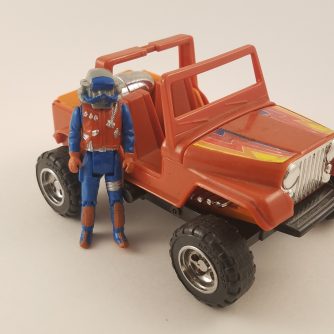
I never had a brand new v1 Storm Shadow from 1984. The only one that I ever had I received from a friend of mine years and years ago when he was getting rid of his old toys. It was in really rough shape, bad 0-Ring, yellowed, missing all the accessories. In other words he was in the condition that you typically find this figure nowadays unless you want to pay hundreds for a complete high grade loose figure.
About 20 years ago I fixed up that figure with a new O-Ring, replaced some of the accessories (I think the backpack and the bow?), but since then that figure somehow…disappeared.
Yes, it’s true. Along with all of my original G.I. Joe file cards, that Storm Shadow figure has been mysteriously AWOL since I moved into this house back in the early 2000s. It’s a fact that haunts me every day. Where the hell could these things have disappeared too?
Anyway, this is not a blog about that, it is merely the setup.
Since my original Storm Shadow has gone missing I’ve held off replacing it, hoping it will turn up some day. Recently though, I ran across a pretty cheap example on eBay that was in the same rough condition as my old one and thought the hell with it and bought it.
My reasoning was I could, if nothing else, try out a technique for restoring old gross white plastic figures on it and if I ruined it by accident well no big deal. But if I was successful, oh man, I might just unlock a new obsession. Rescuing old beat up gross toys and bringing them back to life.

DAY 1
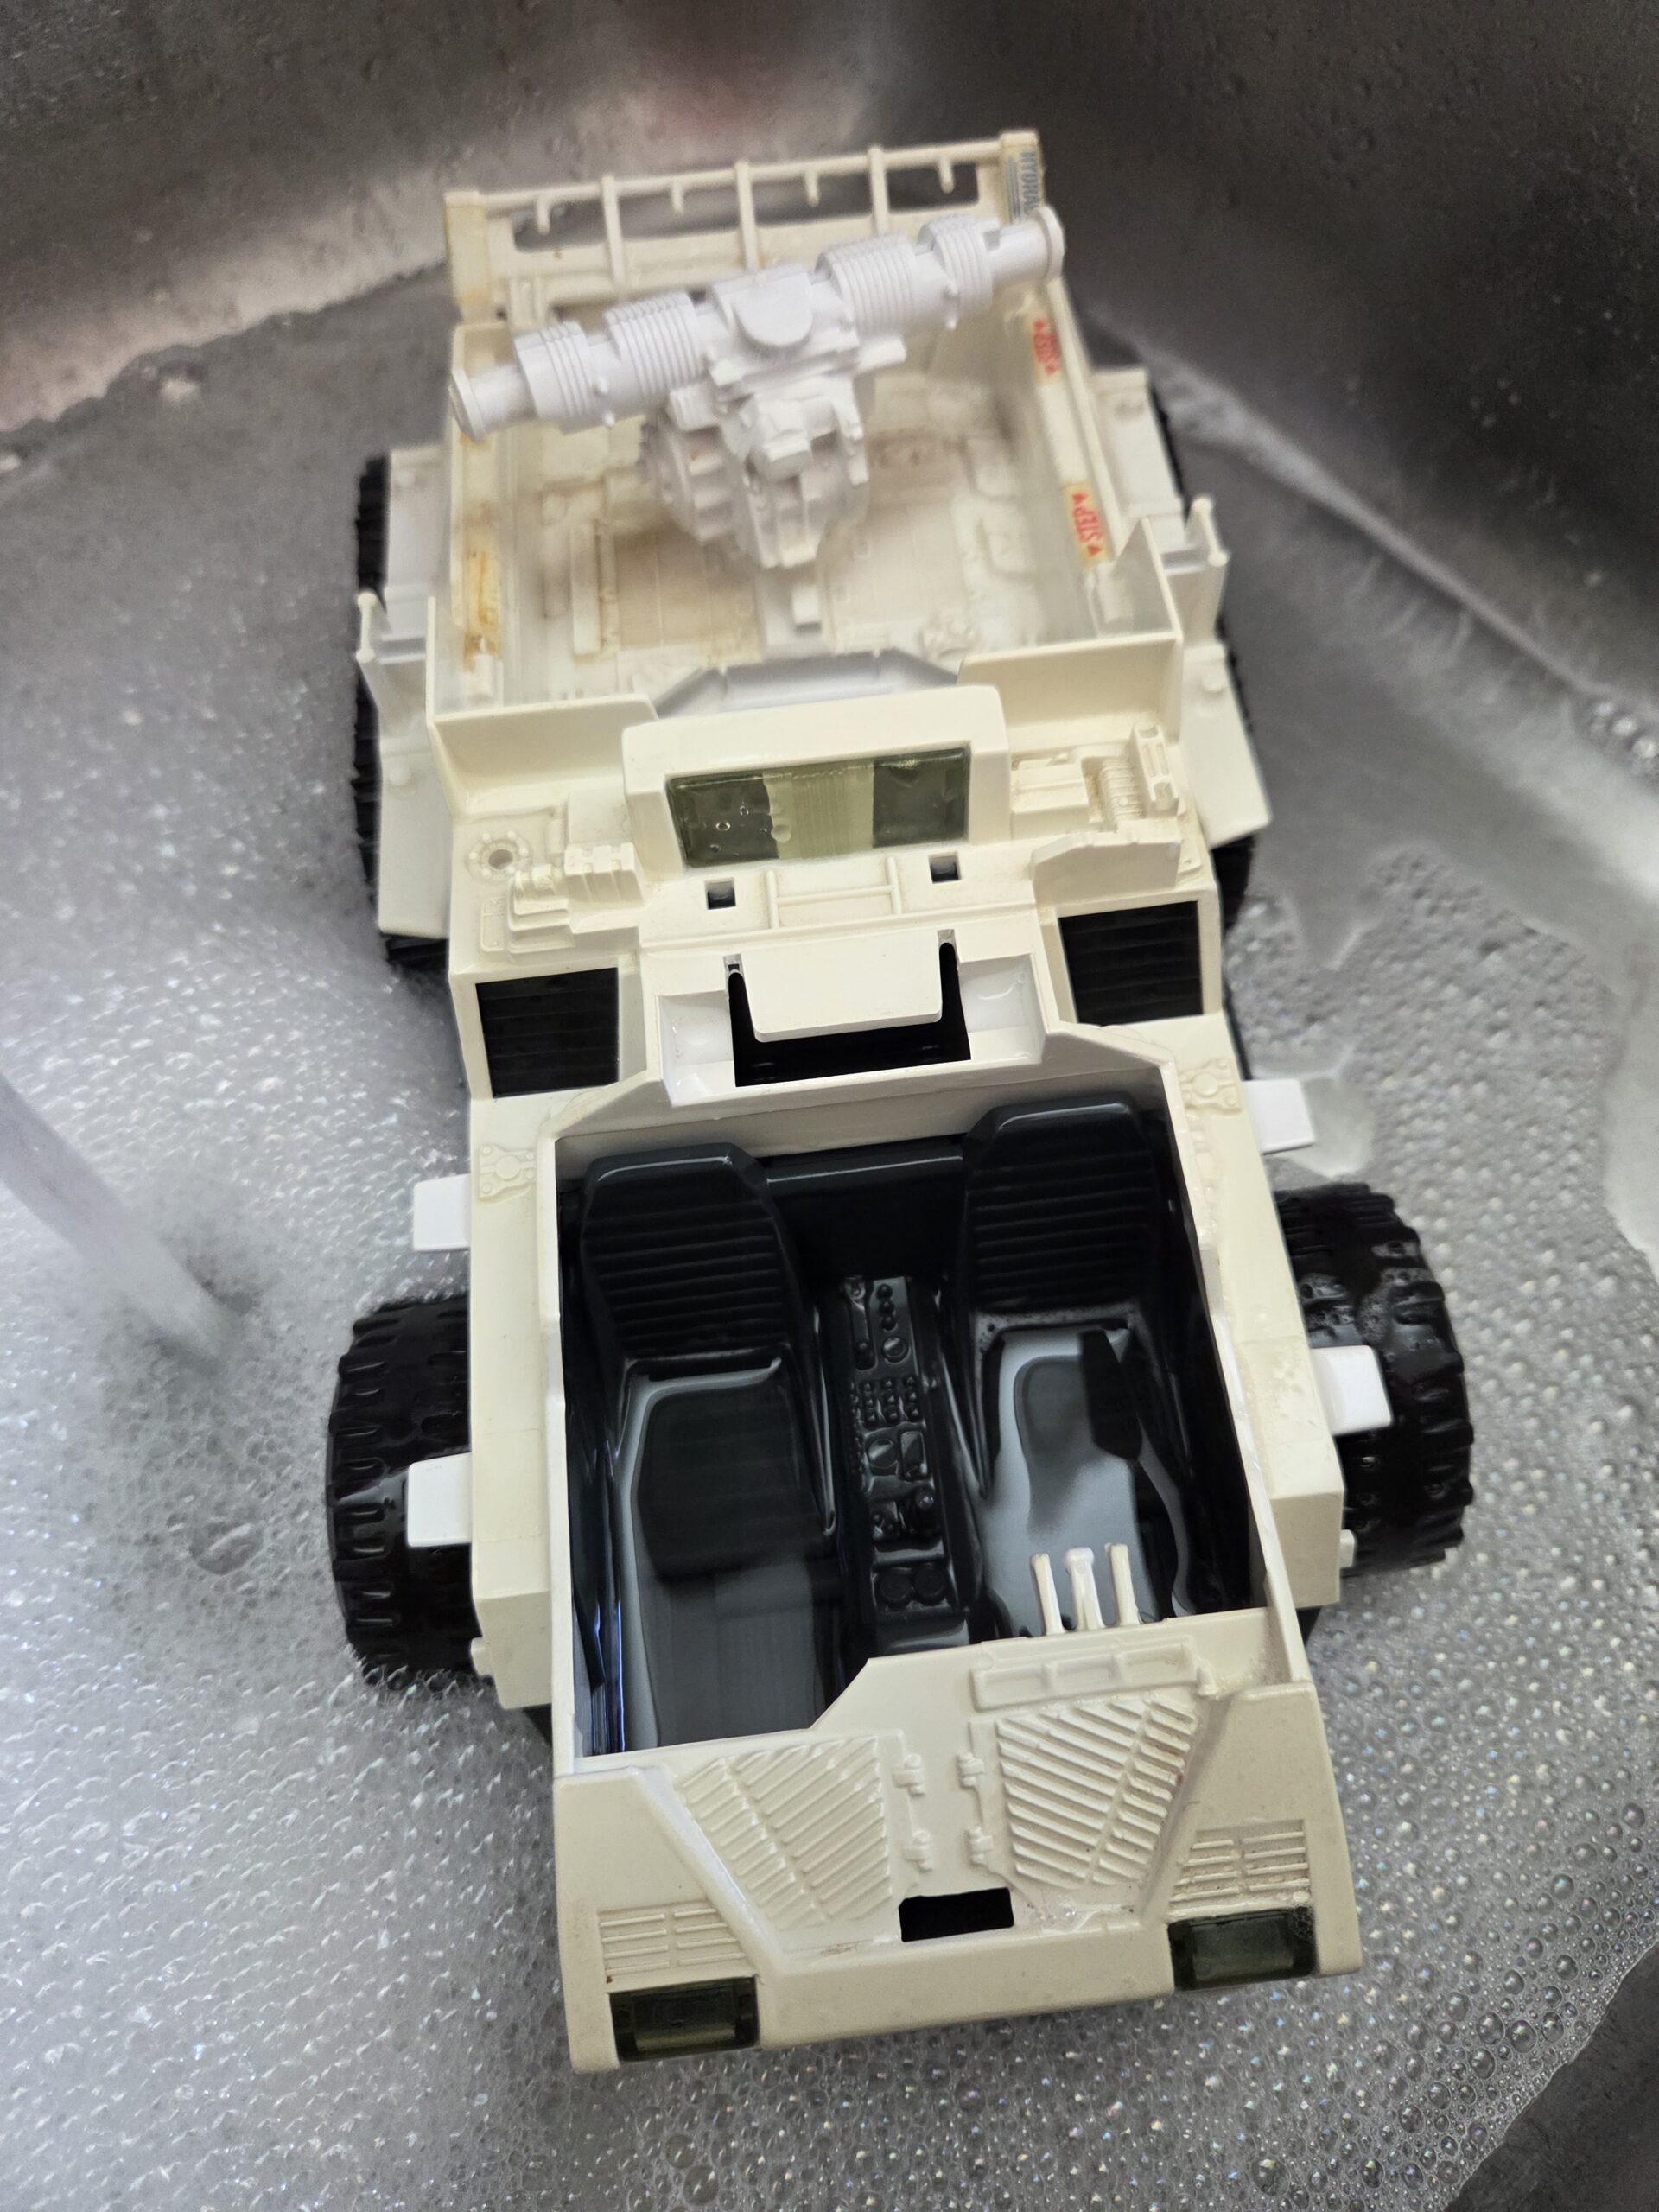
It actually arrived in better shape than I expected, overall the yellowing wasn’t as bad as the eBay pics looked, and another huge plus was the Cobra logo was still a very nice unscratched solid red, not faded or rubbed off at all.

Once I had given it a good wash with dish soap and disassembled it, I found there were really only two pieces that were really badly discolored. Those being the front half of the torso, and oddly enough only back half of the sleeve on the right arm.


It’s so strange, I had never seen just half of a part yellow like this.
Now, the process I used is all over Youtube, and it sounds comically easy which is why I never though it was something that actually worked. I thought it was one of those things that people make look simple in a Youtube video but that never works when you try it yourself.
Basically what you’re going to do is whiten this plastic using some form of Hydrogen Peroxide. There are basically two options. The same liquid peroxide you can get at the drugstore, or, you can get a bottle of the cream peroxide that hair salons use as a hair dye activator.
The salon stuff (Salon 40 is the brand name I used) is three or four times as strong as what you can get at the drug store, but the real reason I wanted to use this for the figure is that it’s a little pastier than the liquid and it kind of brushes on a little thicker than a liquid does. It makes it easier to brush on the spots you want and avoid getting it on areas that you DON’T want. And trust me there are places on this figure you do not want exposed to the peroxide

Which brings me to the other important thing I learned from all the videos I watched. Be careful what you put this stuff on. It will ruin decals, it will fade certain colors, basically it can ruin your figure if you’re not careful.
It’s not just a matter of not brushing this onto surfaces you don’t want whitened though, because what happens is you’re going to seal the part in a container with the peroxide and it’s really the gas created by the perooxide that does most of the whitening. So you really have to take precautions to make sure the places you don’t want to ruin are masked off tightly.
So, after obsessing and worrying about damaging this figure I found a few tips for masking off these areas.
First, you have to protect any exposed skin tone areas, i.e. the arms, and face. For the arms I just used painters tape because that area is pretty easy to mask, it’s a simple wrap around in a straight line.

For the face though I didn’t feel like the tape could be cut to size properly and I really REALLY didn’t want his face to get bleached out. I had seen some misadventures in my research and I definitely wanted to avoid that.
So, for the face I used a blob of poster tac. It’s easy to shape and sticks well but not so well that it will take paint off when you remove it.
Second thing you really have to protect is that Cobra emblem. Red is really susceptible to fading during this process. Red hair, red beards, red paint on clothes, anything red you have to really be careful with.
For this I used the poster tac again. I was able to cover the emblem perfectly.

I also masked off the other paint apps on the body, I didn’t think the black would get ruined (from what I had read) but I didn’t want to chance it. So I masked the black areas and the silver bits on the weapons in his belt.
After this step it’s a simple matter of using an old brush to literally paint the peroxide cream onto the figure. I tried not to get any directly on the mask material, but it’s basically impossible to do so I just hoped for the best that none would work its way through.
I put the pieces in an old disposable food container and wrapped it up with plastic wrap to seal in the gasses.
Now. The next thing you need is sunlight. Lots of it. The stronger the better. The UV rays are what activates the peroxide and the mixture of the peroxide gas and UV rays are supposed to cause a chemical reaction in the plastic itself to bring back the original color. So that’s what I did. I set it out on the porch in direct sun.

Then you just wait for the magic to happen.
How long you have to wait varies. I saw some people get results in just a few hours, some people it took days. One thing they always agreed on was to check on the progress every couple hours though. Apparently it is possible to let this go for too long which can make the plastic brittle or even put pits and scars in the plastic. Not good.
I let this sit in the direct sun (had to move it a few times) for probably six hours the first day.
When I brought the pieces back in the house and cleaned them up I was pretty happy with the parts that were the least discolored to begin with. They were a noticably cleaner looking white than when I started.

And best of all when I peeled off the masking, none of the colors had been damaged. His face was still intact and perfect.

Unfortunately that gross chest piece and yellowed shoulder had hardly changed at all. I could tell it was slightly less yellow but it was not even close to matching the rest of the pieces yet.
So, I re-masked those pieces and got ready to try again the next day.

DAY 2
Day 2 I decided that maybe the container was too big and not concentrating the gases enough. I had seen someone else use a sandwich bag and squeeze all the air out so I figured I’d give that a try. You can see the nice condensation on the bag, that’s a good sign, that’s from the peroxide cooking in the sun!

I also moved spots. The front of the house was a bad location, throughout the day as the sun moved my spot kept ending up in shadows and forcing me to move it. So, I taped the bag down to the top railing of my deck in the back of the house which gets 100% full sun all day. The tape was to keep the wind from blowing the bag away (and also to keep my dogs from just pulling it off and eating it)
I left this out for about another 6 to 8 hours in full sun. Then brought it back in for the night.
DAY 3
I repeated the same process again on day 3, leaving it outside all day while I was at work. I was really starting to feel like I was playing with fire, and really hoped I wouldn’t come home to find the peroxide had started eating through the plastic.
When the sun went down I brought the bag inside and cleaned off the pieces.
I couldn’t believe how much better they looked! The chest was almost an exact match to the color of the back half of the torso, and you could hardly tell a difference between the front and back half of the sleeve.

I decided that even though this was really closed to finished, I had to try it one more time.
DAY 4
I followed the same process on day 4. After another 6 hours in the sun, there was just marginal improvement. At some point you get to a place in this process where the plastic just won’t whiten anymore and I was pretty sure now that I had reached it.

And then, I looked at these two pieces next to the others that had only had 1 day of treatment and decided, what the hell, let’s toss them ALL back in for one more day. The colors matched pretty closely so I reasoned if I gave them another day all together, maybe the would get a little closer. I know, the logic doesn’t make sense really but I wanted to see what would happen.
So I masked everything back up and waited for the next day.
DAY 5
I was getting pretty cocky and confident that this method was practically bullet proof and for some reason I decided to push my luck one more day.
This time however, instead of just brushing on the cream, I decided to put a big lug of it in the bag, drop the pieces in and just smear everything around to get things good and super coated.
I’d be lying if I didn’t start regretting my decision by the end of my day at work. I was sure something bad would happen and I had just ruined it all.
However, after another long day in the sun, once I had everything cleaned off I was amazed to see just how good all the pieces looked. I will admit, I think doing it this way instead of brushing it on carefully might have caused some of the cream to seep under the tape and bleached part of the arm skin a little too much, but I can’t tell for sure. When I look at the before pics it does look like that arm was already a little faded, so I can’t tell for sure if I messed up or if it was already like that.
Either way all of the parts looked shiny and much much whiter than when I started. I had successfully whitened this figure over the course of about 36 hours of sun time and hadn’t faded the Cobra log or wrecked his face at all.


If I had to nit pick one thing it would be the fact that you can still see some of the yellowing behind the Cobra emblem. I knew that would probably happen though because of how protective I was being. The upside is a nice bright red emblem, the downside is it has a little halo of yellow plastic. But, I guess I can live with that. It was more important to me not to ruin the paint.

I’m probably most impressed by how the arm sleeve turned out. It’s not perfect, but it’s incredibly lighter to the point where you really can’t tell the two halves were ever different colors.
THE END
And here is the finished product after 5 days of treatments, re-assembled and with the accessories he came with (minus the missing bow and one of the swords that I’ll need to get off eBay some day)


Overall, I’m very pleased with how this turned out. The moral of the story, mask mask mask, be patient, be persistent, and keep an eye on your progress so you can stop before any damage occurs. This isn’t a set it and forget it for a week project. Also, don’t expect it to turn out case fresh, it’s not going to be perfect, this is 40 year old plastic we’re dealing with.
Well that’s all for now gang, now that I have proven to myself that this isn’t that difficult and it does ACTUALLY work, I plan on trying this on some other old Joe stuff, specifically a seriously yellowed Skystriker I inherited from a cousin when he threw it out when we were kids. So you can look forward to seeing how that project goes hopefully soon!
\his has been a feature of TS-D/JA Productions and JJ2E Media